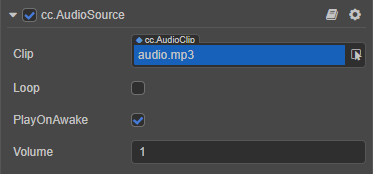
AudioSource Component Reference
The AudioSource component is used to control the playback of music and sound effects.

Select the node in the Hierarchy panel, then click the Add Component button at the bottom of the Inspector panel and select Audio -> AudioSource to add the AudioSource component to the node.
AudioSource Properties
| Property | Description |
|---|---|
| Clip | The added audio asset for playback , default is empty, click the arrow button behind it to select. |
| Loop | Whether to loop. |
| PlayOnAwake | Whether the audio will be played automatically when the game is running (component is active). |
| Volume | Volume, in the range 0~1. |
Audio Playback
Cocos Creator 3.x uses AudioSource to control the playback of audio, which is a component that can be added to the scene, set by the Editor, or called in a script.
In addition, Creator divides audio into longer music and shorter sound effects based on their length.
- If you control audio playback through the editor, there is no difference between playing music and sound effects, but long music is recommended. See the Playback via Editor section below for details.
- If audio playback is controlled via script, the AudioSource component additionally provides the
playOneShotinterface for playing short sound effects, see the Sound Effect Playback section below for details.
Note: Cocos Creator 3.x removes the
audioEngineAPI from v2.x and uses the AudioSource component for audio playback.
Via the editor
Add the AudioSource component to the node.
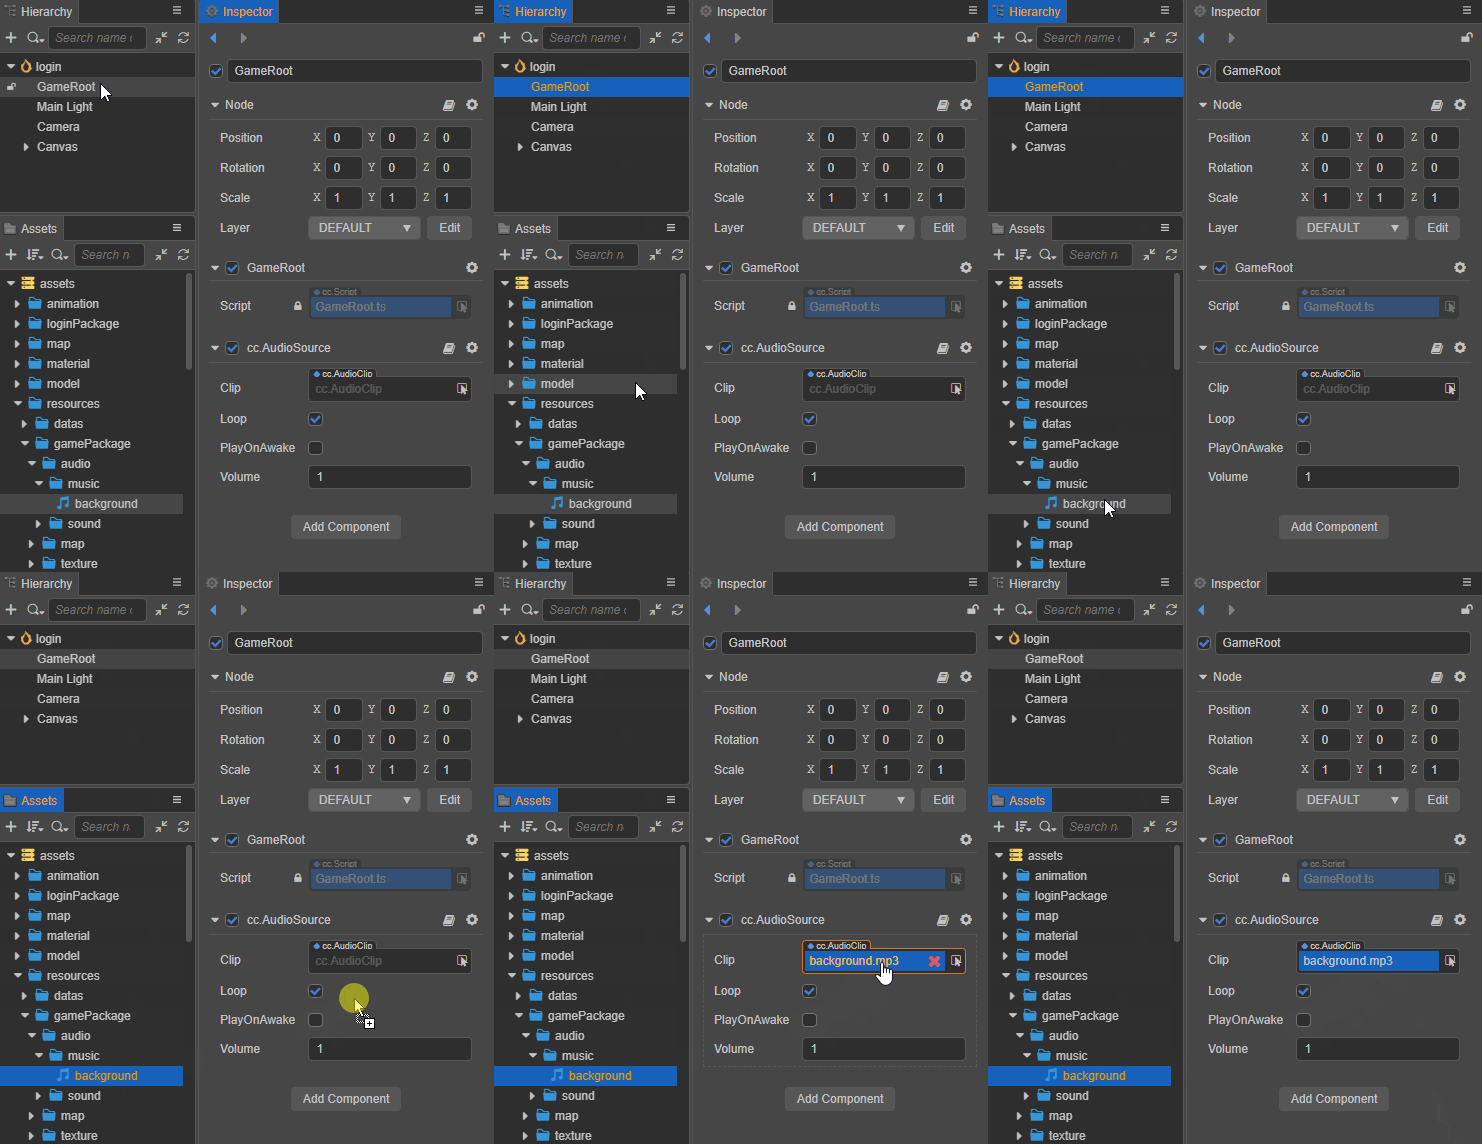
Drag and drop the required audio asset from the Assets panel into the Clip property box of the AudioSource component as follows:

Set the other properties of the AudioSource component as needed.
Via script
For more flexible control of AudioSource playback, you can add a custom script to the node where the AudioSource component is located and then call the appropriate API to control audio playback.
Add the AudioSource component to the node and specify the audio asset.
Create script in the Assets panel and name it (e.g.
AudioController), then double-click to open the script for writing, as follows:typescriptimport { _decorator, Component, Node, AudioSource, assert } from 'cc'; const { ccclass, property } = _decorator; @ccclass("AudioController") export class AudioController extends Component { @property(AudioSource) public _audioSource: AudioSource = null! onLoad () { // Get the AudioSource component const audioSource = this.node.getComponent(AudioSource)! ; // Check if it contains AudioSource, if not, output an error message assert(audioSource); // Assign the component to the global variable _audioSource this._audioSource = audioSource; } play () { // Play the music this._audioSource.play(); } pause () { // Pause the music this._audioSource.pause(); } }Select the node in the Hierarchy panel, then drag and drop the script from the Assets panel to the Inspector panel to add the script component to the node. As shown below:
Audio Playback
Compared to long music playback, sound effect playback has the following characteristics:
- Short playback time
- Large number of simultaneous playback
The AudioSource component provides the playOneShot interface to play sound effects. The specific code implementation is as follows:
// AudioController.ts

import { AudioClip, AudioSource, Component, _decorator } from 'cc';
const { ccclass, property } = _decorator;

@ccclass("AudioController")
export class AudioController extends Component {

    @property(AudioClip)
    public clip: AudioClip = null!

    @property(AudioSource)
    public audioSource: AudioSource = null!

    playOneShot () {
        this.audioSource.playOneShot(this.clip, 1);
    }
}Note:
playOneShotis a one-time play operation, the sound after playing cannot be paused or stopped, and cannot listen to the end-of-play event callback.
For more audio-related scripting interfaces, please refer to AudioSource API.
For more control over audio playback, please refer to the AudioSource playback example documentation.
Register AudioSource Event Callback
Cocos Creator supports registering event callbacks on AudioSource components, with the following usage examples:
import { _decorator, Component, Node, AudioSource } from 'cc';
const { ccclass, property } = _decorator;

@ccclass('AudioDemo')
export class AudioDemo extends Component {

    @property(AudioSource)
    audioSource: AudioSource = null!;

    onEnable () {
        // Register the started event callback
        this.audioSource.node.on(AudioSource.EventType.STARTED, this.onAudioStarted, this);
        // Register the ended event callback
        this.audioSource.node.on(AudioSource.EventType.ENDED, this.onAudioEnded, this);
    }

    onDisable () {
        this.audioSource.node.off(AudioSource.EventType.STARTED, this.onAudioStarted, this);
        this.audioSource.node.off(AudioSource.EventType.ENDED, this.onAudioEnded, this);
    }

    onAudioStarted () {
        // TODO...
    }

    onAudioEnded () {
        // TODO...
    }
}
Web platform playback restrictions
Audio playback on the Web platform currently requires compliance with the latest Audio Play Policy, and even if the AudioSource component has playOnAwake set, It also needs to be played after the first user click event occurs.
